My DIY Spider Dolly!

So, I’m a bit behind on the posting front because I’ve been mired in pre-production for my short film that shoots in July. In fact, “The Lake” is the first film to be featured in the Tarakata Films production blog. You can find out more about the film at the following links:

Find out more and follow our journey from script to film on our production blog:
http://tarakatafilms.wordpress.com/

“Like” our Facebook page for notifications of production updates and screenings:
http://www.facebook.com/pages/The-Lake/142515309154472

Check out our IndieGoGo campaign to help us get the film made:
http://www.indiegogo.com/The-Lake-1

But first, check out my new DIY Spider Dolly! I followed Just Basl‘s video DIY, with a few adjustments, which I will outline below.

Here are the pieces I used for my DIY dolly!

Skateboard: ($20) This is the one I got, but if you can find a cheaper one, so much the better! 🙂
http://www.target.com/Maple-Masters-Slap-Skateboard-Blue/dp/B004EMYK7O/ref=sc_qi_detaillink

Cheeseplate: ($15) Glidecam calls them weight plates, but they’re cheeseplates.
http://www.bhphotovideo.com/c/product/656408-REG/Glidecam_GLCWP_Camera_Weight_Plate.html

Carriage Bolts & Wingnuts: (<$1 each) Available at Lowes and Home Depot. I got one set of 3/8″ (#20) and one of 1.4″ (#16), both 2″ long. I recommend taking your skateboard trucks and cheeseplate in to make sure you get a good length for your setup.

Quick Release Plate: ($30) I got a few of these, one for my DIY dolly, one for my tripod, and one for my shoulder mount. This way, I can switch from one mount to another in the blink of an eye!
http://www.bhphotovideo.com/c/product/554141-STUD/Manfrotto_323_323_RC2_System_Quick.html

And here’s how I put mine together:

Skateboard

I bought a skateboard from Target and pulled the trucks off. I needed pliers to get it started, but after that they came off pretty easily.

Skateboard Trucks

I didn't end up needing to get washers, as there was already a pair on the trucks, There were also these great rubber spacers that I worked into the design.

Cheeseplate

The video calls for carriage bolts and wingnuts to attach the cheeseplate. I got two different sizes, since the holes on the cheeseplate are bigger on one end than the other and I needed to attach them as far out as possible, so the prongs that stick up from the trucks wouldn't interfere with the cheeseplate lying flat. Also, that way the bolt wouldn't wiggle around in the hole.

Carriage Bolts & Wingnuts

I chose 2 inch long carriage bolts, one in 3/8 inch diameter, the other in 1/4 inch diameter. Both Lowes and Home Depot have handy displays that will help you size out your nuts and bolts. Make sure you get either coarse or fine threaded for both!

Trucks Attached to Cheeseplate

I attached the trucks to the cheeseplate with a spacer on either side of the rings on the trucks. The rubber spacers worked so well that I didn't even need to use the washers. They also make it easier to tighten the bolts.
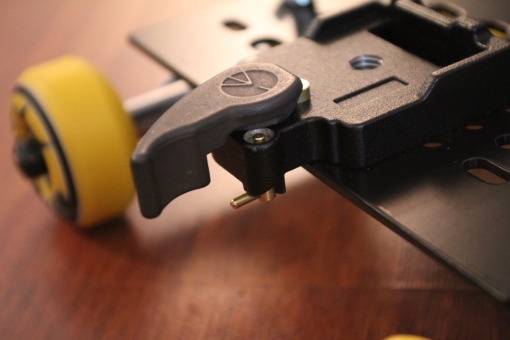
Manfrotto Quick Release Plate

Finally, I attached a Manfrotto 323 quick release plate. The lock on the plate is great, but when I tried to attach it in the center, it kept the plate from sitting flush against the base, so I attached it at the edge with the lock hanging over. The camera still balances perfectly on it.

The Finished Dolly

And here it is all finished! The best thing about this little guy is that you can tilt the wheels in to make a curved path! Just loosen the bolts, adjust, and retighten!

And here are a couple shots I did with my little dolly at a wedding last weekend!

Here’s the dolly with the wheels set for a straight path:

And here it is with the wheels set to follow the curve of the table it was on:
A Chat with the Official White House Videographer

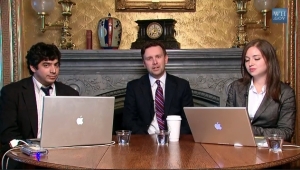
Arun Chaudhary, the first ever official White House Videographer and creator of West Wing Week, and Deputy Press Secretary Josh Earnest sat down with the host of Open for Questions on April 14th to talk about producing West Wing Week and shooting video for the White House. It’s a really interesting watch:

Chat with Chaudry Screenshot

http://www.whitehouse.gov/photos-and-video/video/2011/04/14/open-questions-west-wing-week

Of course, here’s what we all really want to know… Chaudhary’s go to equipment? A Sony EX-3, a Sennheiser 416 (from the 80’s), and Final Cut for post! He also gives some advice for budding videographers at the end of their talk. Enjoy!

*Thanks to my GovLoop buddy, Justin Mosebach, for bringing this to my attention!*

Lessons Learned: 1st All-DSLR Shoot

Here are a few things I learned about running audio on my first all-DSLR shoot.

  1. Run dual system audio and sync it in post. I am so glad we did this. Even my old Zoom H4 picked up amazingly clean audio. An XLR input beats a mini-jack any day of the week.
  2. PluralEyes is your friend. It can save you hours in post by automatically syncing your audio to your video clips.
  3. Even with PluralEyes, you should still slate. If you’re syncing manually, you absolutely HAVE to slate!
  4. PluralEyes (and manual syncing) go more smoothly with a few long clips than a lot of short ones. We were shooting interviews and the B camera was harder to sync, as it had been started and stopped several times during each interview to get different angles. Best practice would be to start the audio recorder first, then the camera(s) and leave the cameras running for as long as possible, even if it means it’s shooting while you change positions for a better shot.
  5. Leave the in camera audio on (and, if possible, use a camera-mount shotgun) to help with the syncing. This is especially helpful if you’re syncing manually.

And here’s the outcome of my 1st all-DSLR shoot! Hope you enjoy it!

Spotted: Childless Man with Diaper Bag!

Recently, my friend Francis Abbey let me in on a little secret. Although, he has no children (that he knows of!), he carries a diaper bag. He has found it to be a great way to carry his camera incognito.

Francis with diaper bag

Fashion Faux Pas or Cool Camera Bag?

After seeing how well Francis’ worked diaper bag for him, I started the hunt for the perfect diaper bag for MY baby! (That is, for my Canon 60D. I, like Francis, am childless, unless you count one very spoiled Boston Terrier.) The selection is almost overwhelming! There is a size/color/pattern/style for just about everybody. So many more options than there are for “real” camera bags! Here are a few things on my must-have list:

  • Magnetic or zipper closures (NOT velcro) – who wants to make noise every time they’re switching lenses? Especially if you’re trying to shoot on the DL!
  • Top flap – to keep the weather away from your precious baby!
  • Inner pockets that will hold lenses – I’ve tried out a few at the store and baby bottle pockets seem to be just the right size for most of my lenses!
  • Style, style, style! – I’ve got to have something that looks like what I would carry as a purse – otherwise, I wouldn’t look very undercover, now, would I?

It has also occurred to me that there are a few other nifty benefits to using a diaper bag for your undercover or casual shooting. First, they usually come with a changing pad, which I imagine would come in handy if you were ever shooting outside and needed to put your gear (or your butt) on the wet ground for a minute. Second, most of the newer diaper bags have clips that will attach to the handles on a stroller. Now, I have a rolling briefcase for my laptop and I bet those clips would work to hook the new diaper/camera bag onto the handle, so I could roll everything together! Third, they have ample room for personal necessities (which is a HUGE plus for us girly girls who have to carry everything all the time!) And finally, do I have to say it again? STYLE! Diaper bags are so much cooler looking than camera bags! Why? Who knows! It makes absolutely NO sense. Why should moms get to look cooler than filmmakers and photographers? Not fair. I’m taking cool back and adopting a diaper bag.

I’m a big fan of the Skip Hop line, especially the Dash, but gentlemen Filmmaker/Photographers may prefer the Eddie Bauer line:

Skip Hop Dash Deluxe Diaper Bag Eddie Bauer Supreme Flap Hobo Diaper Bag

Bottom Line: A great idea for carrying your camera without looking super obvious, but be forewarned: they can be EXPENSIVE! Don’t pull a Tara and fall in love with the $375 one (unless you’ve got buckets of money, in which case, I’d like this one, please)!

BTW: You can (and should) check out Francis’ website and his awesome vlog! His first (award-winning) feature is available on FilmBaby and word on the street is his second film is on its way!

Jar Openers as Follow Focus!?!

So, I ran across a post a few weeks ago that featured a video from Tony Carretti. He found these little jar openers that work beautifully as a follow focus.

Here’s the video:

And here’s the product:

Trudeau Jar Openers

I couldn’t find them in our local Bed, Bath and Beyond, so I ordered some online. And those were back ordered, so I had to wait almost a month to get them. But, I’ve gotta tell ya, they work! They will fit around all of my lenses and they grip beautifully. I haven’t tried it yet, but I imagine you could even put two on a zoom lens and use one for focus and the other for zooms. The only lens that gives these guys a little trouble is my 50mm pancake lens. The focus ring on that lens is very narrow, so the follow focus sometimes slips around a bit, but it I get it on really tight to begin with and check it every once in a while, even that one seems to be fine. And, hey, for this price? I’ll live with a few little imperfections.

One thing to note is that these guys no longer seem to be going for $2.50, as stated in the video. Mine cost me a whopping $4 each. But, I’ll take that over $400 any day!

Bottom line: If you can find these suckers and you don’t have lots of money for gear, they are well worth the (very minor) investment.

Great Looking Web Video from Standard Def Footage

For those of us who are still stuck shooting in SD, here are some quick tips that I learned at a workshop with Richard Harrington of Rhed Pixel and Nicole Haddock of Pictures on the Waves last week.


  1. Sequence Settings

I had been editing and exporting with my FCP sequences set to NTSC DV. Eww, gross! Richard recommends editing in DV, as it will render faster while you’re working, then duplicating the sequence. On the duplicated sequence, you can change the compression to Apple ProRes by right-clicking the sequence and choosing Settings. Then, export that sequence for higher quality compression.

  1. Deinterlacing

Deinterlace before you encode. Don’t use the deinterlacer that is included in your encoding software. Nicole recommended a free application that has been working beautifully for me: JES Deinterlacer. You can download it here: http://www.xs4all.nl/~jeschot/home.html

If you are using mixed footage, use the deinterlacer on your interlaced footage before importing it into your editing software. If it’s all interlaced, you can just use the deinterlacer on the project afterwards.

  1. Converting

Whatever software you use to convert your video (Compressor, Adobe Media Encoder, Episode, etc…), use Variable Bit-Rate (VBR) 2-pass compression, NOT Constant Bit-Rate (CBR). This will allow you to get better looking video, while still maintaining a smaller file size.

If you don’t need your audio to be in Stereo, use Mono instead. Less audio information will make your file smaller (or allow you to use higher quality settings for your video).

Remember that while video pixels are rectangular (taller than they are wide), computer screen pixels are square. If your video is Standard Definition 4:3 (720×480), your output for web needs to be 640×480). For widescreen SD footage, it should be 860×480.

If you are trying to use a less standard size for your video, make the number of pixels in the width a multiple of 16. For some reason that I think has something to do with binary code, computers can process this better.


Hopefully, this will help those dealing with Standard Definition footage. If you want more great tips on editing, check out Richard Harrington’s blog.